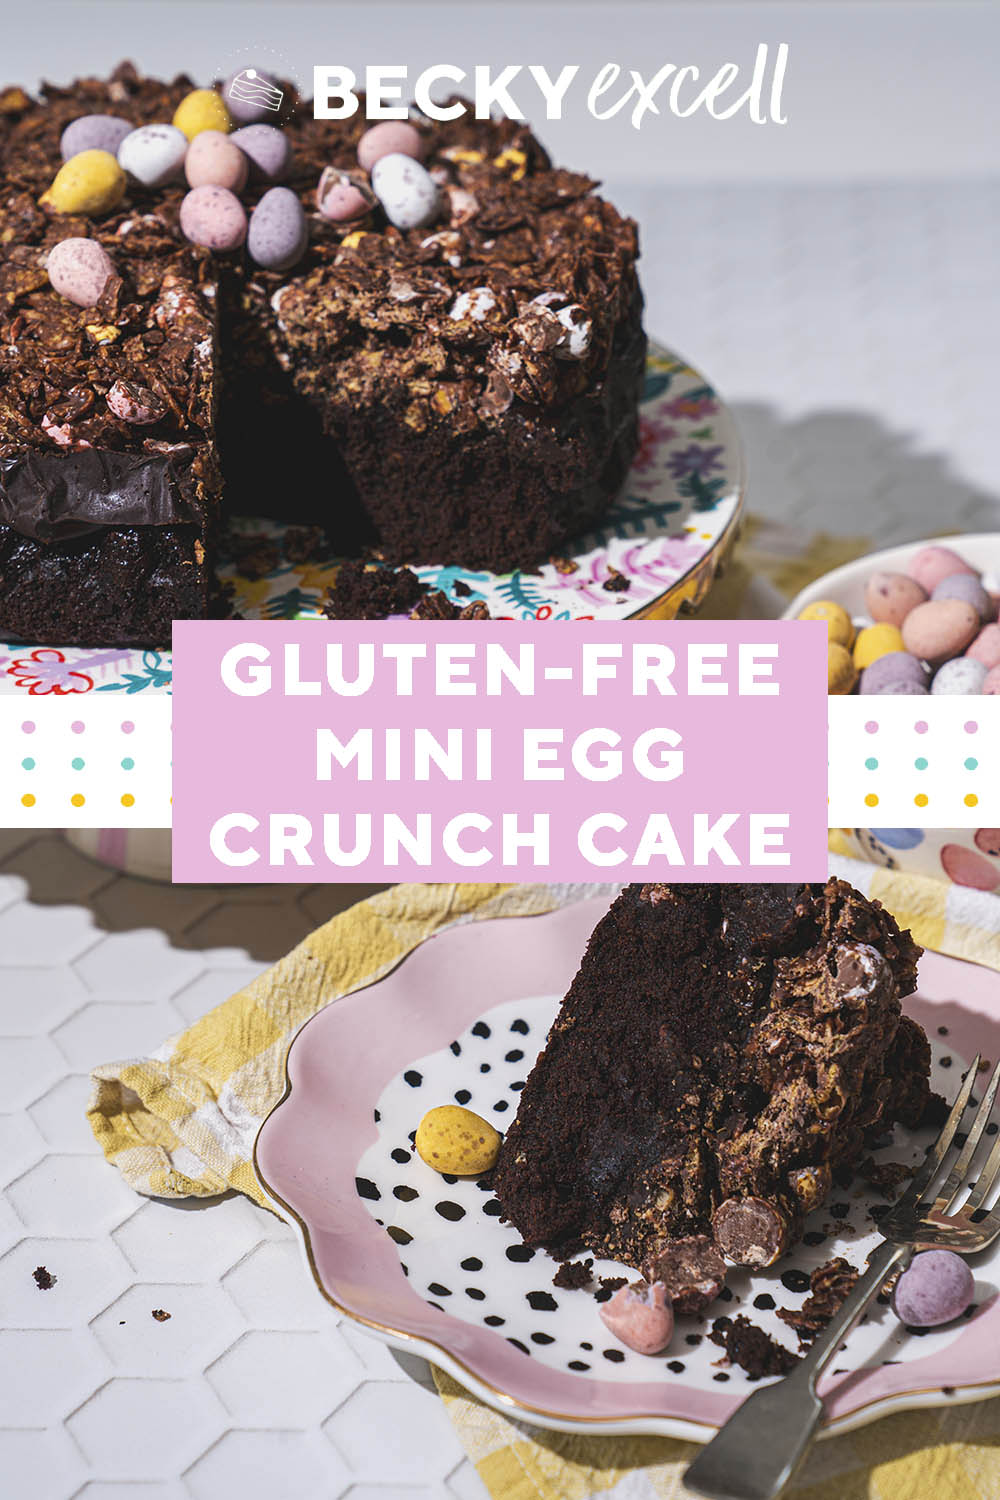
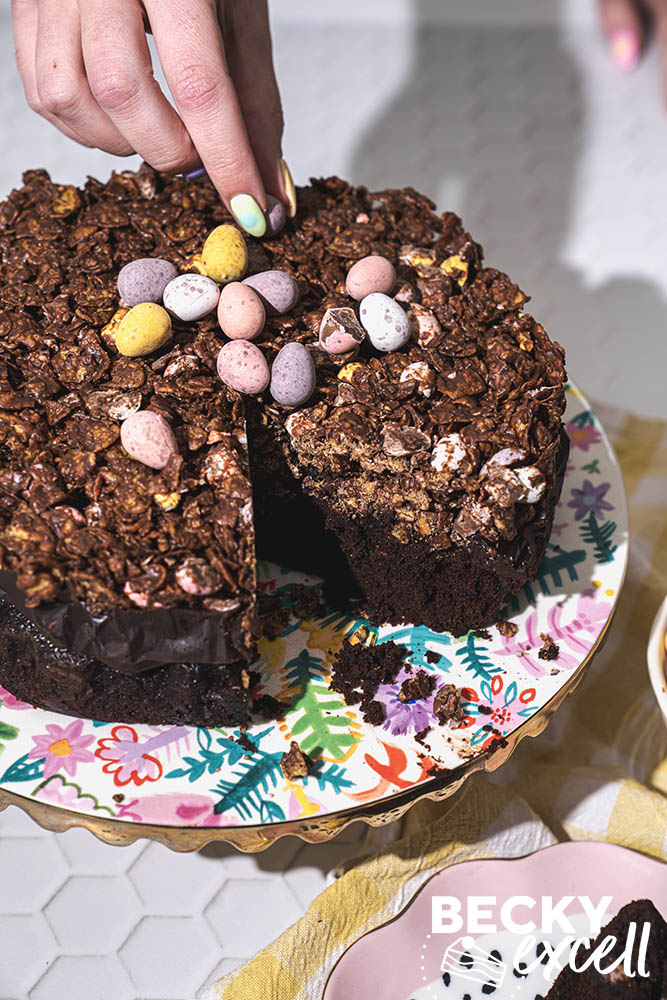
Meet my most gloriously chocolatey, triple-layered Gluten-free Mini Egg Crunch Cake!
If a gluten-free chocolate fudge cake, a Mini Egg nest and a slathering of ganache all got together and threw an Easter party… my gluten-free Mini Egg Crunch cake would be the result. And yes, Mini Eggs are gluten-free in the UK!
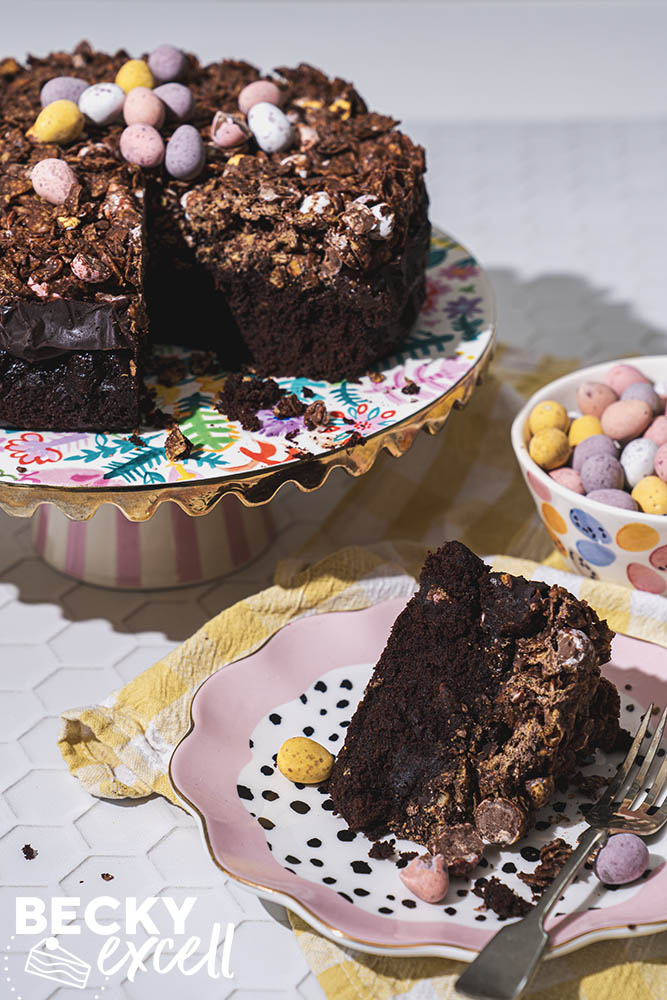
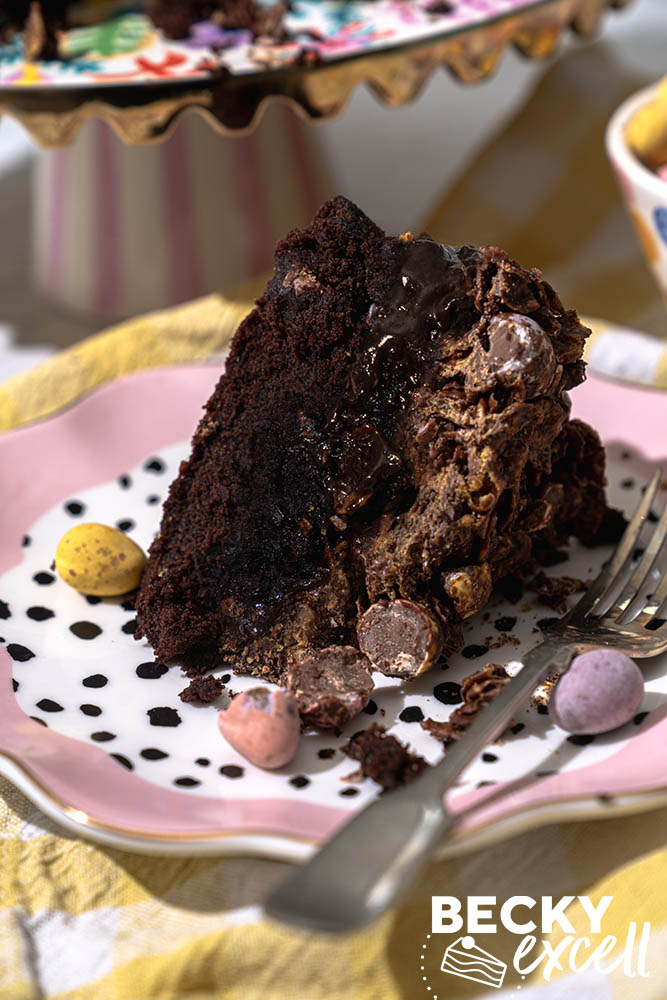
My gluten-free Mini Egg crunch cake starts with a fudgy, squidgy chocolate cake, topped with a thick layer of glossy ganache, then crowned with a crunchy chocolate cornflake and Mini Egg layer. It’s a little bit cake, a little bit dessert, and completely the sort of thing people suddenly get very interested in when it appears on the table!
I also love that, despite looking like a full-on showstopper, it’s actually very straightforward to make. There are layers, yes, but none of them are anything you couldn’t easily make separately on any other occasion. And once it’s all together, it has that unmistakable ‘Easter is here’ energy, even if your aspirations were to just make something simple, modest and easy.
Why you’ll love my gluten-free Mini Egg Crunch Cake
- The different textures of each layer make this divine! The cake itself is soft, rich and deeply chocolatey, with that lovely slightly squidgy crumb that makes a chocolate cake feel properly indulgent. Then you’ve got the ganache layer, which adds this smooth, silky middle moment before the crunchy Mini Egg-crammed topping crashes the party in the best possible way.
- I’ve never made an Easter cake that screams ‘Easter baking’ quite this much! It’s basically a huge nostalgic chocolate cornflake nest (with crunchy, chocolatey, crushed Mini Eggs) but promoted into cake topping! It gives the whole cake a brilliant contrast and stops it being just another chocolate cake with some Mini Eggs sitting on top.
- It’s like two desserts in one: served warm as pudding or chilled/room temp as a slice of cake. If you serve it warm, it’s gloriously soft and pudding-y, with the ganache going all saucy and dramatic. If you chill it first, you get neater slices and more defined layers. So really, this is one of those rare cakes that’s doubles up as both!
- And of course, because it’s gluten free, it’s one of those lovely recipes where nobody feels like they’re getting the second best version of anything. It’s just a really good chocolate cake that happens to be gluten free. Which, frankly, is exactly how it should be!
Ingredients for my gluten-free Mini Egg Crunch Cake
This cake comes together in three layers, but they all earn their place, promise!
For the cake, you’re making a rich chocolate sponge with a lovely deep flavour from the cocoa powder and coffee. Don’t worry, it doesn’t taste like coffee! It just makes the chocolate flavour feel darker, richer and more grown-up, like it’s put on a little top hat or something. 😂
The milk mixed with lemon juice gives you a quick homemade buttermilk, which helps keep the cake nice and soft. Then you’ve got your gluten-free flour, baking powder, bicarbonate of soda and xanthan gum all working together to make sure the texture stays fluffy and tender rather than dry and crumbly.
For the ganache, it’s just the dream team: chocolate and double cream. Simple, easy, glossy and irrestistable.
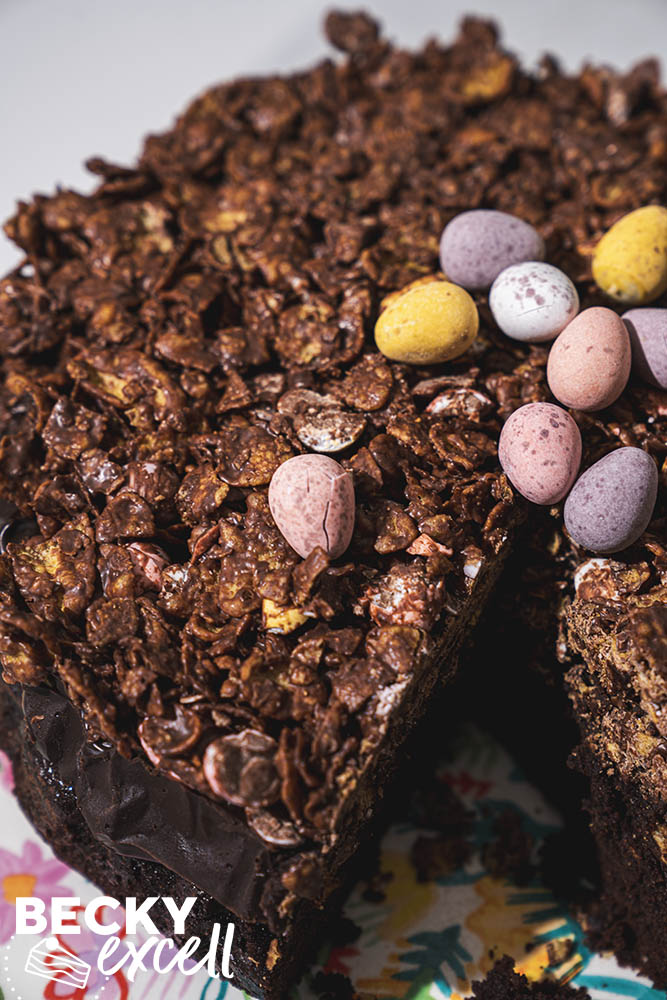
Then the top layer is where the Easter fun really kicks in! Melted chocolate, gluten-free cornflakes and crushed Mini Eggs all stirred together into a crunchy layer that sits on top like a glorious crown.
As always with gluten-free baking, do your usual ingredient checks before you start, especially when it comes to the cornflakes.
How to make my Gluten-free Mini Egg Crunch Cake
- You start by making the cake batter. First, the milk and lemon juice are mixed together to create a quick buttermilk, then that gets combined with the eggs, melted butter and vanilla. Separately, you mix together all the dry ingredients, then bring the wet and dry together until you’ve got a smooth batter.
- Then in goes the coffee, which makes everything looser and glossier and slightly alarming if you’ve never made a chocolate cake like this before… but trust the process! Into the tin it goes, then into the oven until baked through.
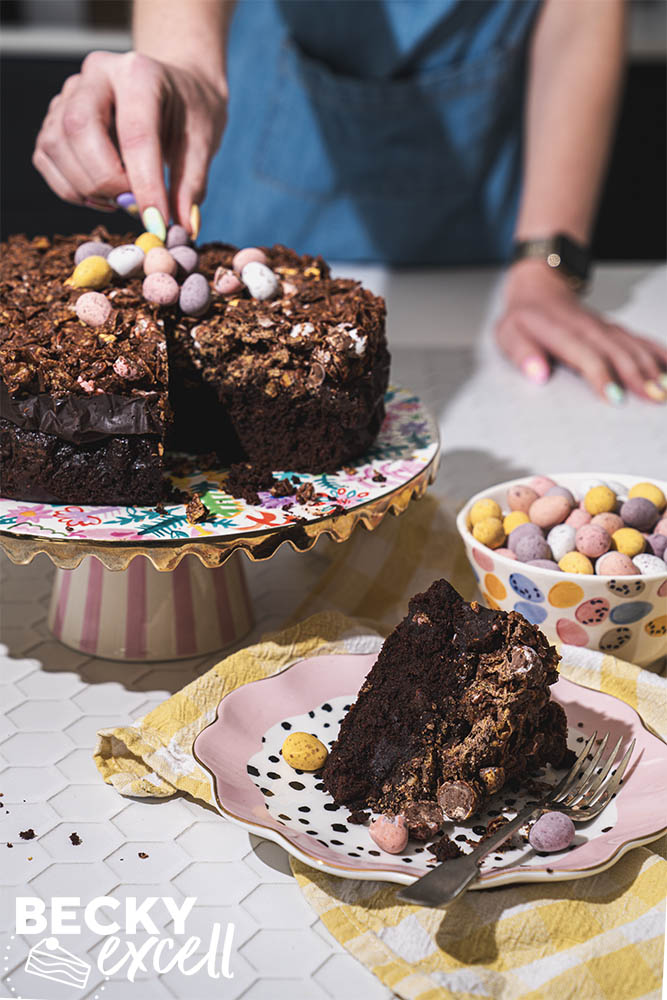
- Once the cake has cooled completely, the fun layering begins. The ganache is poured over the top first, spreading into a glossy chocolate layer. Then you make the cornflake topping by coating the cornflakes in melted chocolate and stirring through the crushed Mini Eggs before spooning it all over the ganache.
- At this point, you have a choice! You can dive in straight away if you want something warm, soft and gloriously messy, or chill it for a couple of hours for cleaner slices and more distinct layers. Personally, I love the best-of-both-worlds option: chill it first, then warm individual slices up slightly before serving. It’s a very good life choice!
A few tips before you start
The first thing to say is line your springform tin really well! This batter is quite loose before baking, so you don’t want any escape attempts happening in the oven.
Also, make sure the cake is completely cool before you add the ganache. If it’s still warm, the ganache will melt straight into it and you’ll lose that lovely defined layer.
When it comes to the Mini Eggs, don’t pulverise them into dust. You want bits, not pastel-coloured dust!
And if the chilled version feels a little too firm straight from the fridge to slice, let it come back towards room temperature before serving, or warm a slice slightly. The cake gets softer, the ganache loosens up, the cornflake layer becomes a little less rock hard and everything becomes a bit more outrageously good.
Storage and leftovers
This cake keeps really well in the fridge for up to 3 days. Just keep it covered so it doesn’t dry out.
It’s at its absolute best in the first day or two, when the cake is still lovely and soft, the ganache is glossy and the cornflake topping still has a bit of crunch. After that, it’s still delicious, but the topping will gradually soften a little.
If you’ve chilled the whole cake, I’d let it sit out for a bit before serving so the whole thing can soften up again. Or, even better, warm individual slices very slightly in the microwave. The ganache goes all glossy and saucy, the cake turns extra squidgy – it’s like it was just baked!
Recipe tips, swaps and FAQs
Can I make this dairy-free?
Yes, you can! This one is actually pretty easy to make dairy-free, and if you use the right swaps it becomes vegan too.
Here’s what I’d use:
- For the milk: use plant-based milk
- For the butter: Stork hard margarine
- For the cocoa powder: Ensure it’s dairy-free
- For the ganache: use a dairy-free chocolate and Elmlea Plant Double (not stocked as widely as in the past, but still available in Sainsbury’s and Morrisons)
- For the topping chocolate: make sure this is dairy-free chocolate too
- For the Mini Eggs: use Mummy Meegz Chickee Eggs, which are dairy-free, vegan and gluten-free
A couple of little notes! For the ganache, the cream matters, so I’d stick to a plant cream that behaves like double cream rather than anything too thin.
At the time of writing all the above swaps are gluten-free and dairy-free but please check with your own eyes in case things ever change!
Can I make this vegan?
If you follow the dairy-free swaps above, then all you have to contend with are the eggs. I’d use flax eggs instead, made from:
- 2 tbsp milled flaxseed
- 6 tbsp water
Mix them together and leave them to thicken for 10 minutes before using in place of the eggs.
Is this low FODMAP?
No, sadly not!
Where do I find gluten-free cornflakes?
Most big supermarkets sell them, usually in the free from aisle. They’re not usually hard to find once you know to look for them, but definitely don’t assume all cornflakes are gluten-free, because they absolutely are not!
Do I have to use coffee in the cake?
Yes, I really would if you can. It doesn’t make the cake taste of coffee, it just deepens the chocolate flavour beautifully. It’s one of those quiet background ingredients that makes everything taste better without announcing itself.
Can I use milk chocolate or dark chocolate?
Yes to both! You can use either in the ganache and the topping, depending on how sweet or intense you want it. Milk chocolate will give you a sweeter, more crowd-pleasing finish, while dark chocolate makes the whole thing feel a little richer and more grown-up.
Can I serve this warm?
Yes, absolutely, and it’s delicious that way! If you serve it straight after adding the topping, it’ll be a bit messier but gloriously soft and pudding-like. If you want cleaner slices, chill it first and then warm individual portions up later.
What tin did you use?
I used a 23cm springform deep cake tin for this. And I really would line it well, because the batter is on the looser side before baking and you don’t want any chocolate escapees.
Can I make this the day before?
Yes! It’s a great make-ahead cake. Just keep in mind that if it’s been in the fridge, you’ll probably want to let it sit out for a bit before serving so the cornflake layer softens up again – especially if it’s been in there longer than 2 hours.
Why is my cake batter so runny?
That’s completely normal! Once the coffee goes in, the batter becomes much looser and glossier than you might expect. Don’t panic, it bakes up beautifully.
Why did my topping go messy when I sliced it?
If you cut it before chilling, the ganache and cornflake topping will be softer and more relaxed, shall we say! For neater slices, chill the cake first so those layers can firm up properly.
Gluten-free Mini Egg Crunch Cake
Equipment
Ingredients
For the cake layer:
- 190 ml milk mixed with 1 tbsp of lemon juice
- 2 medium eggs
- 80 ml butter melted and cooled
- 1 tbsp vanilla extract
- 200 g gluten-free plain flour
- 50 g cocoa powder
- 160 g caster sugar
- 150 g light brown sugar
- 1 tsp gluten-free baking powder
- 1 tsp bicarbonate of soda
- ½ tsp xanthan gum
- 1 tbsp instant coffee mixed with 190ml boiling water
For the ganache layer:
- 125 g chocolate milk and dark chocolate both work, chopped
- 125 g double cream
For the cornflake layer:
- 165 g chocolate milk and dark chocolate both work
- 110 g gluten-free cornflakes
- 110 g mini eggs crushed + extra for topping
Instructions
- Preheat the oven to 160C fan / 180C and prepare a 23cm springform deep cake tin with non-stick parchment paper (ensure there are no gaps so no chance of mixture leaking!).
- In a medium bowl mix together the milk and lemon juice and leave to sit for 10 minutes or so until it starts to thicken / you see lumps!
- Add the eggs, melted butter and vanilla extract to the bowl and mix to combine.
- In a large bowl, sift together the dry ingredients – gluten free plain flour, cocoa powder, caster sugar, light brown sugar, gluten free baking powder, bicarb and xanthan gum.
- Add the wet mix into the dry ingredients and mix together until well combined, there should be no pockets of dry ingredients visible. I do this on a slow speed with an electric hand mixer, trying not to overmix.
- Stir in the coffee (coffee mixed with boiling water), it will make the cake batter much looser but nice and glossy. Pour this into your cake tin and bake in the preheated oven for around 45 minutes until fully baked. Check that it’s cooked by sticking a skewer into the centre of the cake – if it comes out clean, then it’s done.
- Leave to completely cool in the tin – don’t take it out as extra layers need to be added still.
- For the ganache, place the chopped chocolate in a glass heat proof bowl and put to one side. Heat the double cream in a saucepan on a low heat until it’s just starting to simmer, then remove from the heat and pour over the chocolate. Leave for a few minutes then stir together, the chocolate will have melted and you are left with a lovely thick glossy pourable ganache.
- Pour it over the cooled cake and allow it to spread to the edges.
- For the cornflake layer, either melt the chocolate in a bain marie or in the microwave in short bursts and then stir through the cornflakes to fully coat them. Then stir through the crushed mini eggs. Spoon the mixture on top of the ganache in a level layer.
- Now at this point you have a choice:If you want to just tuck in straight away, feel free to remove the tin and tuck in – the top would be a little messier this way but it’s delicious warm like this.If you want to wait, place in the fridge for a couple of hours, the ganache and top will firm up and you can then cut clean slices. Do leave to come up to room temperature so the cake is squidgy again!The best of both worlds is placing it in the fridge to firm up so you can cut clean slices and then warm up portions in the microwave. The ganache layer will become more saucey and the fudge cake is always delicious warm.You can top with extra mini eggs to serve too!
Nutrition