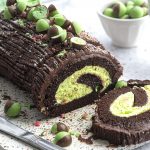
Gluten-free Mint Chocolate Yule Log Recipe (dairy-free option)
Gluten-free mint chocolate yule log recipe - SUPER easy to make and nobody would never know it's Coeliac-friendly and wheat-free.
Servings 12
Calories 343kcal
Equipment
Ingredients
For the sponge:
- 100 g caster sugar
- 4 large eggs
- 65 g gluten-free self raising flour
- 1/4 tsp xanthan gum add this even if your flour already has it in it
- 40 g cocoa powder ensure dairy free if necessary
For the filling:
- 300 ml double cream use a dairy-free alternative - linked in FAQ section
- 75 g icing sugar
- 1-2 tsp mint extract
- 150 g mascarpone cheese use a dairy-free alternative - linked in FAQ section
- green food colouring optional - linked in FAQ section
For the icing:
- 400 g icing sugar
- 30 g cocoa powder ensure dairy free if necessary
- 40 g butter softened (use Stork hard margarine if dairy-free)
- 70 ml milk use dairy free if necessary
For decoration: (optional)
- candy canes crushed
- Aero Peppermint Bubbles linked in FAQ section
Instructions
For the sponge:
- Prepare your swiss roll tin by greasing it and then placing baking paper onto it. Make sure it fits really well as you want the full shape of the tin.
- Preheat your oven to 180C Fan / 200C.
- Using an electric hand whisk, whisk together your sugar and eggs until light and a little frothy. It should only take a few minutes.
- Sift in your gluten free flour, xanthan gum and cocoa powder (always sift cocoa powder otherwise it can be quite lumpy). Fold this into your mixture carefully until fully combined.
- Pour/spoon the mixture into your tin, ensuring it spreads right to the edges. Try your best to get it even as it will be pretty thin.
- Bake in the oven for about 9 minutes. The sponge should have come away a little bit from the sides of the tin and be slightly risen.
- Remove the sponge from the oven and very carefully invert it (turn it upside down!) onto another piece of baking paper on a flat surface. Carefully peel off the baking paper that was on the bottom of it in the oven.
- Whilst the sponge is still warm, roll the sponge up with the paper inside it as you roll. Put your rolled up sponge to one side and leave it to cool completely whilst still rolled. I usually put something heavy
against it to ensure it stays fairly tight and doesn't unroll.
For the filling:
- In a bowl whisk together your double cream, icing sugar and mint extract until soft peaks form.
- Add in your mascarpone and whisk briefly until it stiffens up.
- Carefully stir in a few drops of green food colouring until you have your desired minty colour.
For the icing:
- Add all your ingredients to a standing mixer (you could use an electric hand mixer too) ensuring you sift in the icing sugar and cocoa powder.
- Start the mixer on low and then increase to a higher speed as it all comes together. If it's not coming together, add a little extra milk very slowly.
- It should be lovely and thick but still able to be spread. If you want it to be thinner, then add a little extra milk, and if you want it more thick then sift in some extra icing sugar (mine is always perfect or a little too thick, never too runny).
To assemble:
- Carefully unroll and remove the baking paper. Fortunately I never find the sponge cracks using my recipe, but if it does, it doesn't matter - it will all be covered in icing!
- Spread a layer of about 1cm thick of your filling on the unrolled sponge (I leave about a half cm gap around the edge). Carefully roll the sponge back up and transfer it to the serving board. Do this as tight as you can for the best swirl.
- Cover the rolled up sponge with the icing and use a fork or sharp knife to go over it to make a wood like pattern.
- Dust with icing sugar and finish with crushed candy cane pieces and any mint flavoured chocolates you can get your hands on!
- Cut the ends off to reveal your swirl and enjoy!
Nutrition
Serving: 1g | Calories: 343kcal | Carbohydrates: 47g | Protein: 4g | Fat: 16g | Saturated Fat: 9g | Polyunsaturated Fat: 5g | Cholesterol: 92mg | Sodium: 141mg | Fiber: 1g | Sugar: 40g