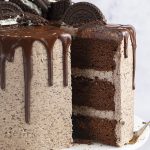
My '70K' Gluten Free 'Oreo' Drip Cake Recipe (dairy free option)
My gluten free oreo drip cake recipe is an amazing show-stopper that nobody would ever guess was gf! You can easily make this dairy free too.
Servings 16 slices
Calories 683kcal
Ingredients
For the sponges
- 350 g butter or dairy free alternative
- 500 g caster sugar
- 6 large eggs
- 440 g gluten free plain flour
- 50 g cocoa powder ensure it's dairy free if necessary
- 4 tsp baking powder ensure its gluten free
- 1/4 tsp xanthan gum this is really important as we are using plain flour in this recipe
- 100 g yoghurt
- 200 g dark chocolate melted
- 200 ml boiling water
For the 'Oreo' buttercream
- 440 g butter or dairy free alternative - Stork Hard Baking Block, softened
- 1 kg icing sugar
- 1 packet 160g of gluten free and dairy free 'Oreos'
- 2-3 tbsp milk or dairy free alternative
For the topping
- Extra gluten free and dairy free 'Oreos'
For the drip
- 200 g chocolate
- 4 tsp vegetable oil
Instructions
- Preheat your oven to 160C Fan / 180C and prepare 3 circular 20cm cake tins with baking paper.
- Cream together your butter and sugar until light and fluffy.
- Add your eggs (one at a time), and mix in between each addition.
- Sift in your gluten free flour, cocoa powder, xanthan gum, baking powder. Fold the mixture so all the dry ingredients are completely combined.
- Add your melted chocolate, yoghurt and boiling water. Carefully mix together until fully combined.
- Divide your mixture evenly between your 3 tins and bake four about 20-25 minutes each. Check with a skewer to check they are cooked. I bake two of the sponges and then the third afterwards as I like to bake them all on the middle shelf.
- Once baked, allow the cakes to cool in their tins.
- Now to make the buttercream. Place your butter in a stand mixer (or electric hand whisk if you don't have a stand mixer), mix on its own on a high speed for about 5 minutes. The butter should change from a more yellow colour to being a lot more pale.
- Add your icing sugar in 3-4 stages. Mixing for about 3 minutes between each addition.
- Blitz or crush your gluten free and dairy free 'Oreos' so that they are really fine.
- Add your 'Oreo' crumbs to the buttercream and mix together to combine.
- Add 2-3 tbsp of milk to loosen the buttercream slightly if needed (probably not needed if using dairy free margarine etc)
- Time to assemble your cake! Place the first sponge onto a cake stand/plate and spread icing on top of it - then add your second sponge on top of that. Spread icing once again and finish by placing your final sponge on top. Don't use up all your icing in between each sponge layer - be modest with it!
- Apply a really thin layer of icing (using your plastic icing scraper) all over the outside of your cake - this is the crumb coat. You can achieve this by applying the icing all over and then scraping it off again as much as possible. Place the cake in the fridge for 30 minutes.
- Once the crumb coat has locked in the crumbs, you can begin applying the icing and scraping it smooth. I do this with a cranked palette knife all over, then scraping it smooth. See the video links in the blog post above for the best ways on how to do this - it's hard to describe purely in writing!
- Then make your drip - really simple. Melt your chocolate in the microwave and then thoroughly mix in your oil. Allow to cool a tiny bit (about 5-10 minutes) before using.
- Using a piping bag, apply your drip around the edge of the top of your cake at around 1 cm intervals. Make each drip a varying length if you can! Then use the rest of your drip to cover the top of the cake.
- Finish with crushed gluten free 'Oreos' and you're done! Enjoy!
Nutrition
Serving: 1g | Calories: 683kcal | Carbohydrates: 90g | Protein: 6g | Fat: 35g | Saturated Fat: 21g | Polyunsaturated Fat: 11g | Trans Fat: 1g | Cholesterol: 120mg | Sodium: 333mg | Fiber: 2g | Sugar: 71g