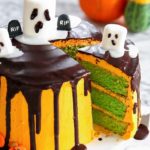
Gluten Free Halloween Drip Cake Recipe with Marshmallow Ghosts
My Gluten Free Halloween Drip Cake Recipe with Marshmallow Ghosts recipe is so easy and simple to make! It's dairy free and low FODMAP too.
Servings 12
Ingredients
For the sponge cake
- 400 g caster sugar
- 400 g unsalted butter, room temp (or dairy free spread / margarine)
- 395 g gluten free self raising flour
- 1/4 tsp xanthan gum
- 1 tsp gluten free baking powder
- 1 tsp vanilla extract
- 8 medium eggs (you want them to weigh 400g too ideally)
- 3 tubes green food gel (I use the extra strong Dr Oetker, do NOT use liquid colouring)
For the buttercream (inside the cake and around it)
- 595 g unsalted butter, room temp (you can use dairy free equivalent but I do find once you've made the icing you need to chill it)
- 1 kg icing sugar (I know this seems like a lot but I prefer to make more than less!)
- 3 tubes orange food gel (I use the extra strong Dr Oetker, do NOT use liquid colouring)
For the chocolate drip
- 200 g dark chocolate (the darker the better colour wise!)
- 3-4 tsp sunflower oil
- black food gel (just to help darken the colour even more!)
For decoration
- different sized marshmallows (I bought some of the really large ones and some medium sized ones)
- 100 g icing sugar
- 1-2 tbsp warm water (with glace icing you just keep adding until its the right consistency, if you add too much, just add more icing sugar!)
- dark coloured writing icing pen (to make the ghost faces!)
- additional halloween decorations (I bought the pumpkins and gravestones pre-made from the supermarket!)
Instructions
- Heat your oven to 160C fan and prepare three 20cm round cake tins with parchment paper.
- Make your sponge cake mix in a large bowl - I use a Kitchen Aid stand mixer. Cream your butter until light and fluffy. Then add your caster sugar and continue to cream together until well-combined.
- Add in your gluten free flour, baking powder, xanthan gum, vanilla extract and eggs. Once basically mixed, start to add your food colouring gel. Make sure it mixes through the entire mixture not just the top. Keep adding until you are happy with the colour. Try not to overmix or the mixture could split - if it does, don't worry, it doesn't really matter!
- Divide your mixture between your three tins. I tend to weigh mine to make sure they are even. Then pop in the oven for 30 minutes until kind of golden (obviously you are looking for a green cake but the top doesn't always stay green - the inside will be!), and a skewer comes out clean (make sure they are all evenly cooked, but never open the oven during cooking).
- Allow to cool a little in their tins before turning them out onto a cooling rack to cool completely.
- To make your buttercream, cream your butter (again, I use my Kitchen Aid stand mixer) until very light and fluffy. It can take a while with the amount we are making, so be patient!
- Then gradually add your icing sugar, a quarter at a time. Mix until fully combined. Add in your food colouring gel and continue to mix for a further few minutes to enable the buttercream to get its fluffiness back whilst it's still stiff - and turn orange!
- If your cakes are not flat then take a sharp knife or a cake leveller, thinly slice the very top of your now cooled sponges to make them nice and flat.
- Place one of your sponge cakes onto a cake stand or other flat surface where your cake will remain. Place it with the flattest side down.
- Using a spatula, spread an even layer of icing on top of the sponge cake. Leave around a 1cm gap from the edge of the cake.
- Place your next sponge on top, press down lightly and repeat.
- Place your final sponge on top with the flattest side facing up and press down lightly again.
- Next, we're going to give the cake a 'crumb coat' of icing. That's just a fancy way of saying we're going to be applying really thin layer of icing and letting it set before icing it for real. It acts as a nice smooth base for our final icing coat. So using a spatula, apply your icing to your cake and spread it around to be as thin as possible.
- Use your icing scraper to basically try and lightly scrape as much icing off as possible from the sides without damaging the cake. You should be able to see the cake through the icing - that's how thin is should be! The top doesn't matter too much, just make sure the icing on top is nice and flat. Now leave that to set for 15 minutes until its a little more crisp on the outside.
- Now to ice it for real! Using a spatula, dollop the rest of your icing onto your cake and spread it around evenly. Don't go overboard on icing the top or you won't have enough left for the sides. The trick here is that you want to put too much on the sides and scrape the excess off with the scraper for a nice smooth finish.
- Allow this coat of icing to set until you can feel a crisp coating. This should take about 30 minutes.
- Now for the ganache! Melt your dark chocolate (I use the microwave in short bursts) and then stir in your oil and black food colouring gel. Allow to sit for no less than 10 minutes. Then pour your ganache into your piping bag.
- Pipe a circle of ganache around the edge of the top of your cake. Once you've got a nice circle, start blobbing your ganache so that it drips over the edges. Small blobs will result in a short drip and a big blob will result in a long drip. Use small and big blobs randomly to get a nice messy effect.
- Once the sides are looking fab and drippy, use the rest of your ganache to cover the top of the cake. Allow this to set for a few hours and you're done.
- To make your marshmallow ghosts, take one big marshmallow and two small ones. Place them where you'd like them on top of your cake.
- Next, mix up your white glacé icing by combining the icing sugar and hot water in a bowl. Once nice and smooth and consistent, spoon it over each marshmallow.
- Allow that to set for an hour or so, then use your black icing pen to ice on eyes and a mouth for each ghost. Job done!
- Enjoy!