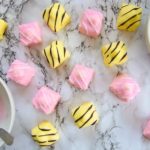
My Gluten Free French Fancies Recipe (dairy free, low FODMAP)
Say hello to my gluten free French fancies recipe (or Fondant Fancies if you fancy!) They're dairy free and low FODMAP too.
Ingredients
For the sponge
- 225g caster sugar
- 225g dairy free spread / margarine or butter if you can tolerate dairy
- 4 large eggs
- 225g gluten free self raising flour
- 1/4 tsp xanthan gum
- 1/2 tsp vanilla extract
For the buttercream
- 250g dairy free spread / margarine or butter if you can tolerate dairy
- 200g icing sugar
- 1/2 tsp vanilla extract optional
For the fondant icing
- 1kg fondant icing I use a ready to roll block
- 150ml water
- pink and yellow food colouring I use paste
- flavouring vanilla essence, lemon extract, rose flavour (optional and only a drop or so)
For the drizzle on top
- 100g dark chocolate melted
- 100g icing sugar
Instructions
- Preheat your oven to 160C. Grease a square baking tin (I used a 23cm loose bottom tin, but a slightly smaller or bigger one would be fine too).
- Place all your sponge ingredients into a bowl and whisk together using an electric hand whisk or a mixer. Mix until smooth and well combined.
- Pour your mixture into your prepared tin. Place in the oven for about 40 minutes until cooked and golden.
- Allow to cool in the baking tin for 5-10 minutes before placing it on a cooling rack to cool completely.
- I then place my cake in the fridge to chill whilst I make my buttercream. (Actually I lie, I put it in the freezer for a few minutes often as I forget... just don't let it actually freeze!) This helps it become stronger to work with later.
- For the buttercream, mix together your icing sugar and dairy free spread / margarine in a bowl until lighter in colour. Add 1/2 tsp of vanilla essence.
- Place a quarter of your buttercream in a bowl and place in the fridge to chill - this will be for the blob on top of each fancy.
- Once your cake is chilled and you are ready to use your buttercream, cut your cake into squares. My squares were 3.5cm x 3.5cm (I chose this size as it was also the height of my cake which made even cubes).
- Next using a knife, generously, but smoothly, spread your non-chilled buttercream around all 4 sides of each cake (not the top or bottom). We're not aiming for neat and tidy at this point!
- Spoon a small blob of the chilled buttercream on the top of each cake. The smoother you make your blob, the better your fancies will look - try and make all the blobs around the same size too. When you're done, place back in the fridge for about 30 minutes. I'd recommend keeping them on the cooling wrack whilst in the fridge.
- Whilst the cakes are chilling, make your fondant icing. Cut your block of fondant into smaller chunks and pop into a free standing mixer (like a KitchenAid). Churn the icing until it starts to break down - you can add a little water to help the process here.
- When the icing starts to slightly change and break down, gradually add your 150ml of water and the icing should become smooth and more pourable. We're aiming for a PVA glue like consistency.
- Separate out your icing into two different bowls and then add a little yellow food colouring to one and a little pink food colouring to another. To your yellow icing, add 1/2 tsp of lemon extract. To your pink icing, add 1/2 tsp of vanilla essence or rose flavour.
- Take your buttercream covered sponges out of the fridge. Using the back of a knife or a palette knife, scrape the buttercream on each side of the sponge so that's it's lovely and smooth. You should leave a nice, smooth but razor thin layer of buttercream on every side. The smoother, the better! Try not to damage the blob on top at this point.
- First, we'll make your pink French Fancies. Take a few teaspoons of the pink fondant icing and tip it all right on top of the blob of buttercream. It should just slowly dribble down all sides of the cake, with any excess going through the cooling rack and onto parchment paper. Keep adding new teaspoons of the icing until it's all nice and covered. Repeat with your yellow fancies too.
- Leave them to set for a minimum of 5-6 hours, but the longer the better. The icing needs to be nice and set - not being dented when touched.
- When your icing it set, melt your dark chocolate in a microwave in a bowl.
- Drizzle your melted dark chocolate over the top of your yellow fondant fancies. I used a piping bag for this, but you can always let it drip from the back of a teaspoon too.
- Then, take 100g of icing sugar and add a few tablespoons of water until nice and PVA glue-like again.
- Do the same for your pink fancies with the icing you just mixed up and drizzle like crazy.
- Allow everything to set and you're done!
- Enjoy!