Gluten-free Christmas Tree Cupcakes Recipe
Gluten-free Christmas tree cupcakes recipe - 100% beginner friendly and super simple to make. You'd never know they were Coeliac-friendly and wheat-free.
Servings 12 -14
Calories 543kcal
Ingredients
For the cupcakes
- 200 g butter softened (use Stork hard margarine if dairy-free)
- 200 g caster sugar
- 4 medium eggs
- 165 g gluten-free self-raising flour
- 25 g cocoa powder
- 1/4 tsp gluten-free baking powder
- 1/4 tsp xanthan gum
For the buttercream
- 200 g butter softened (use Stork hard margarine if dairy-free)
- 400 g icing sugar plus extra to finish the cupcakes for a snowy finish
- 1-2 tsp vanilla extract
- green food colouring gel see FAQ for more info
To decorate:
- gluten-free Christmas sprinkles
- chocolate stars for the top of each mini tree (see FAQ for more info)
- edible gold leaf optional
Instructions
For the cupcakes:
- Preheat your oven to 160C Can / 180C and place cupcake cases into your cupcake tin. I sprinkle a little rice into each hole before the case as this helps reduce unwanted moisture.
- Cream together your softened butter and sugar using an electric hand whisk. Do so until lighter in colour and fluffier in texture.
- Gradually add your eggs (I whisk briefly in between each addition) and mix in.
- Sift in your flour, cocoa, baking powder and xanthan gum and then mix with your electric hand whisk until combined.
- Spoon your mixture into your cupcake cases and place in the preheated oven for 20-22 minutes.
- Remove from the oven and allow to cool very briefly in the tin, then move the cases to a cooling rack.
For the buttercream:
- For the buttercream, ensure your butter is soft and at room temperature. I find it takes a good hour out of the fridge to soften, but never let it go too soft! Place your butter into a large bowl or a stand mixer and mix on a medium speed for about 3-5 minutes until the butter has gone a lot more pale in colour.
- Add your icing sugar gradually. I add it in 2 stages and beat for about 3 minutes between each addition. Start your mixer slowly to save your kitchen from a real icing sugar mess, but then increase the speed to medium / high for each of your 3 minutes.
- Add your vanilla extract and mix once more then add your green food colouring. Ideally use a highly concentrated gel colouring rather than a liquid one (Sugar flair, Colour Splash and Pro Gel are all brands I use). Mix thoroughly so the colouring coats all the buttercream and its the colour you want - with good colouring you shouldn't need more than a tsp really, but get it to a colour you are happy with.
- It should now be done. Ensure it's the right thickness - it should be if you've beaten it for long enough. However, if it's too thick you can add a tiny amount of milk. And if too thin, sieve in a little extra icing sugar - this might be the case for dairy free buttercream using hard margarine. Neither of these should be necessary but I thought I'd mention, just incase!
To assemble: (all decorations are linked in FAQ section)
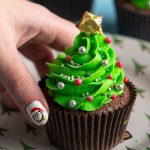
- Once your cupcakes are cool, transfer your green icing into a piping bag with a medium closed star nozzle. See the video in my 5 top tips for perfection above for guidance. Then, pipe your buttercream on top.
- Finish with large pearl sprinkles and place around each cupcake like baubles. Next, scatter smaller colourful sprinkles on top and sift on a delicate sprinkling of icing sugar to look like snow.
- Finish with a chocolate star on top (I covered some of mine in a little gold leaf for the ultimate finish). Of course, these are just how I finished mine in the photos - feel free to use whatever you like!
Nutrition
Serving: 1g | Calories: 543kcal | Carbohydrates: 66g | Protein: 4g | Fat: 30g | Saturated Fat: 18g | Polyunsaturated Fat: 10g | Trans Fat: 1g | Cholesterol: 128mg | Sodium: 433mg | Fiber: 1g | Sugar: 52g