Gluten-free Crunchie Cheesecake Recipe (No-bake)
Gluten-free Crunchie cheesecake recipe - it's no-bake and super easy to make! Creamy, delicious, indulgent and full of chocolate honeycomb.
Servings 8 -12
Calories 634kcal
Equipment
Ingredients
For the base
- 320 g gluten-free digestive biscuits
- 150 g butter melted
- 1 Crunchie bar optional
For the filling
- 600 g mascarpone or cream cheese always full fat (I sometimes use up to 750g for an even taller cheesecake - you don't need to adjust the other ingredients if you do this)
- 100 g icing sugar
- 300 ml double cream
- 1 tsp vanilla extract optional
- 150 g - 200g Crunchie bars chopped
For the topping
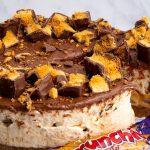
- 150 g Crunchie chocolate spread
- extra Crunchies chopped
Instructions
- Firstly, make your base. Crush your gluten free biscuits and 1 Crunchie bar (you could use more if you like in the base). Either place them in a sandwich bag and hit them with a rolling pin or you can place them in a food processor and blitz, but don't over blitz them into a fine dust!
- Melt your butter - I do this in the microwave on a medium power (600W) for around 30 seconds to 1 minute. But if it melts before this time, stop - it's done!
- Pour your melted butter into your crushed biscuits and mix together in a bowl.
- Press your biscuit mixture into the tin you are going to be making your cheesecake in. Press it down nice and firmly. I use a 20cm loose bottom tin (linked above and below).
- Place it in the fridge to chill whilst you make your cheesecake top. (I leave mine in the fridge for at least 30 minutes)
- To make your cheesecake filling, mix together your mascarpone (cream cheese), icing sugar and vanilla extract. I use my electric hand mixer to do this on a low/medium setting for only about 10-20 seconds. You could use a stand mixer too.
- Add in the double cream and keep mixing until it firms up a little. (I mixed on a medium setting for just under 2 minutes for this - try not to over mix though... don't let it split - it's better to stop early than let it split!) It should end up being a nice, fairly thick mixture you can spoon - NOT a pourable consistency.
- Fold in your chopped up pieces of Crunchie, so they are evenly dispersed throughout the mixture.
- Spread your mixture on top of the biscuit base and place in the fridge to chill overnight.
- Mix up your Crunchie spread in a bowl to loosen it up - this will make it easier to spread. Spread it over the top of the chilled cheesecake. I do this whilst it's still in the tin. Place back in the fridge briefly to let the Crunchie spread chill (if you don't have time it wouldn't matter too much here).
- Remove from the tin and decorate however you like. I just break up some extra Crunchie bars and cover the top in a random pattern.
- Keep refrigerated until serving, or if you have any leftovers. Enjoy!
Video
Nutrition
Serving: 1g | Calories: 634kcal | Carbohydrates: 36g | Protein: 5g | Fat: 53g | Saturated Fat: 33g | Polyunsaturated Fat: 15g | Trans Fat: 1g | Cholesterol: 129mg | Sodium: 389mg | Fiber: 1g | Sugar: 28g